
In the past, our users have asked for more flexibility to incorporate different data sources into eTool for gap filling data in LCAs. Well, we have heard you and we have now changed the way you can integrate other data sources into your designs!
Introducing: Layers
 The intention behind Layers is not just to create flexibility when incorporating another dataset into your LCA, it is also to provide more transparency on where the impacts are coming from down at the elemental level.
Jump to the following sections in this post:
Layer Order Rules
Impact values are calculated through a layered selection process that uses the data in a layered order. The base layer will be whichever default LCI source that you have selected in eTool (i.e. eTool Default Australasian, United Kingdom, Europe etc) – this dataset will always be the most complete therefore this will be your Project Default LCI source.
Next is the Dataset Layer – when there is an impact value in this layer, that data will take precedence over the value in the Project Default LCI.
Lastly is the EPD Layer. If a value exists in the EPD Layer, this will be automatically used instead of the Dataset or Default layer. Below is a graphical representation on how these layers work.

Being the most complete, data from the Project Default LCI layer will always be used to fill any gaps in both the EPD and Dataset Layer across all lifecycle modules and environmental indicators.
In the situation where there are gaps in the EPD and/or Dataset Layers to calculate the total value for a particular module, eTool will first use the values available in the EPD and/or Dataset Layers and then fill the remaining gaps from the Project Default LCI.
For example, recurring impact is calculated by combining transport plus material impacts. Depending on the EPD and/or Dataset Layers selected, the transport values will be used if available, while the material value will come from the Project Default LCI if unavailable in the Dataset Layer to calculate the total recurring impacts.
How to Use the Dataset Layer
To select the Dataset Layer, navigate to the Project level of your design and select the applicable dataset in the Dataset Layer field which is located below the Calculation Standard. Don’t forget to click on ‘Save’ at the bottom of the page to apply your selection.

The Dataset Layer will automatically apply the layer rules as listed in the section above for all materials. Please refer to the Dataset Scope section below for more information on what is in scope for the available dataset layers.
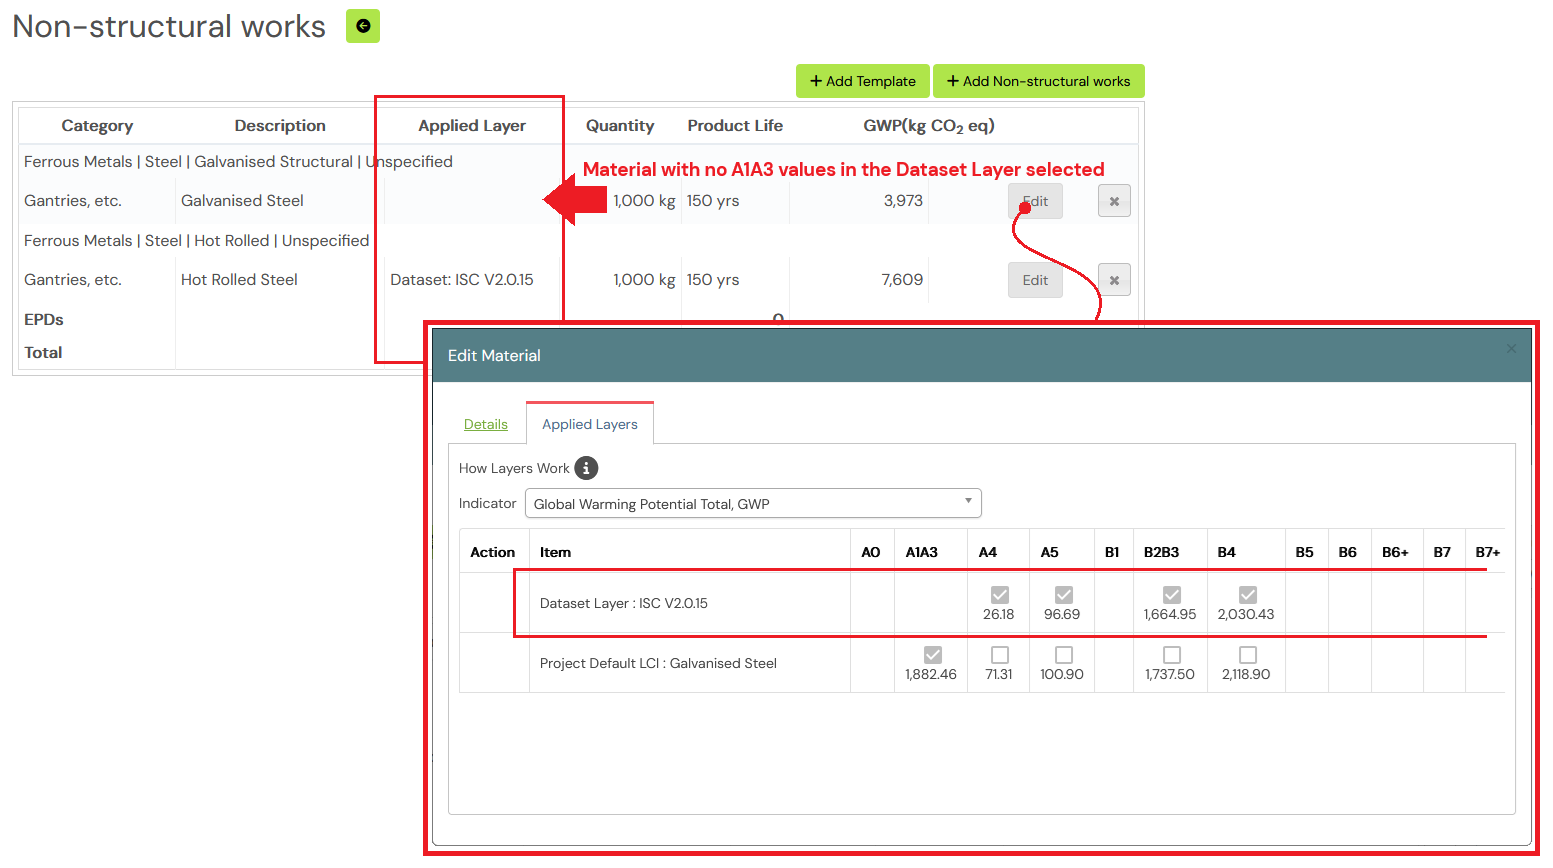
You’ll also note that in your Designs, there is now a new column called ‘Applied Layer’. This column will indicate when the material’s A1A3 values are covered by the Dataset Layer selected.

When you click into the material, everything will look the same as before except you’ll see an extra tab for ‘Applied Layers’ and two new switches to quickly turn off material replacement and maintenance/repair.

When you click into the ‘Applied Layers’ tab, you’ll see the following table with the impacts for the two layers for each lifecycle module. You can also change the table to display the impacts in the different indicators. Note that the check boxes are not editable as the system automatically applies all values based on the layer rules above. This table is read-only.
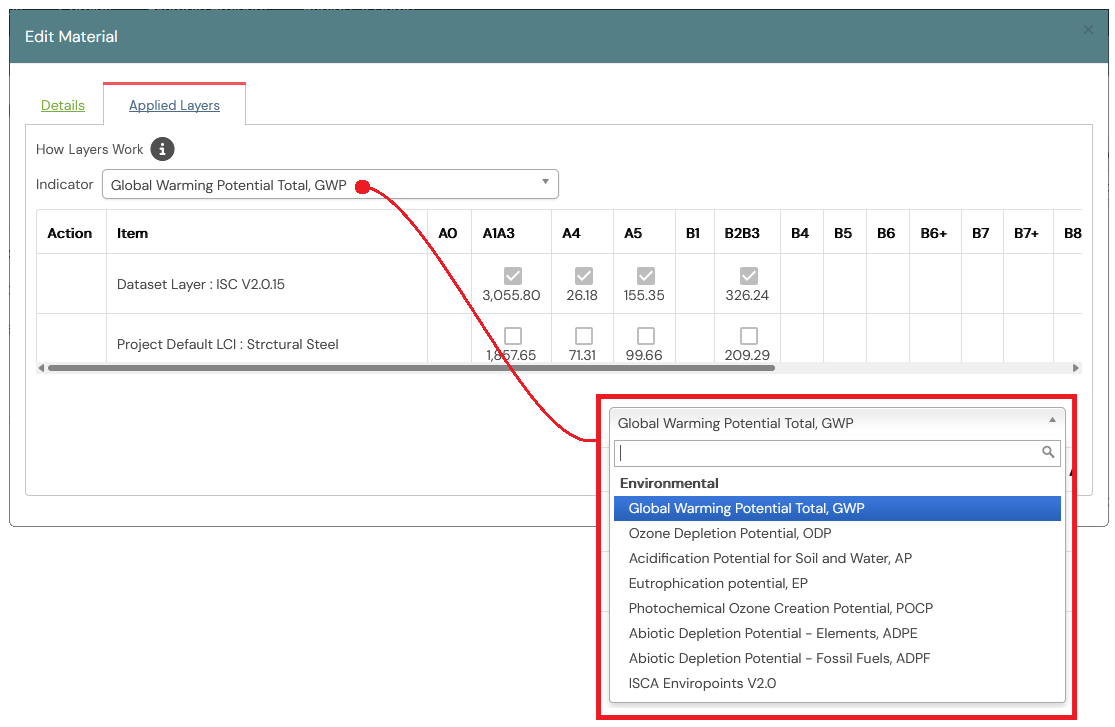
When you scroll across, the whole table looks like this.

For materials where the A1A3 values are not covered by the Dataset Layer, (i.e. nothing under the Applied Layer column in the Category view) the remaining module impacts may still be covered depending on what’s available in the Dataset layer. For the example below, the ISC dataset has data for transport therefore modules A4, A5, B2-B4 & C2 will be calculated based on a mixture of ISC transport impacts and the Project Default LCI A1A3 values.
Dataset Layer Scope
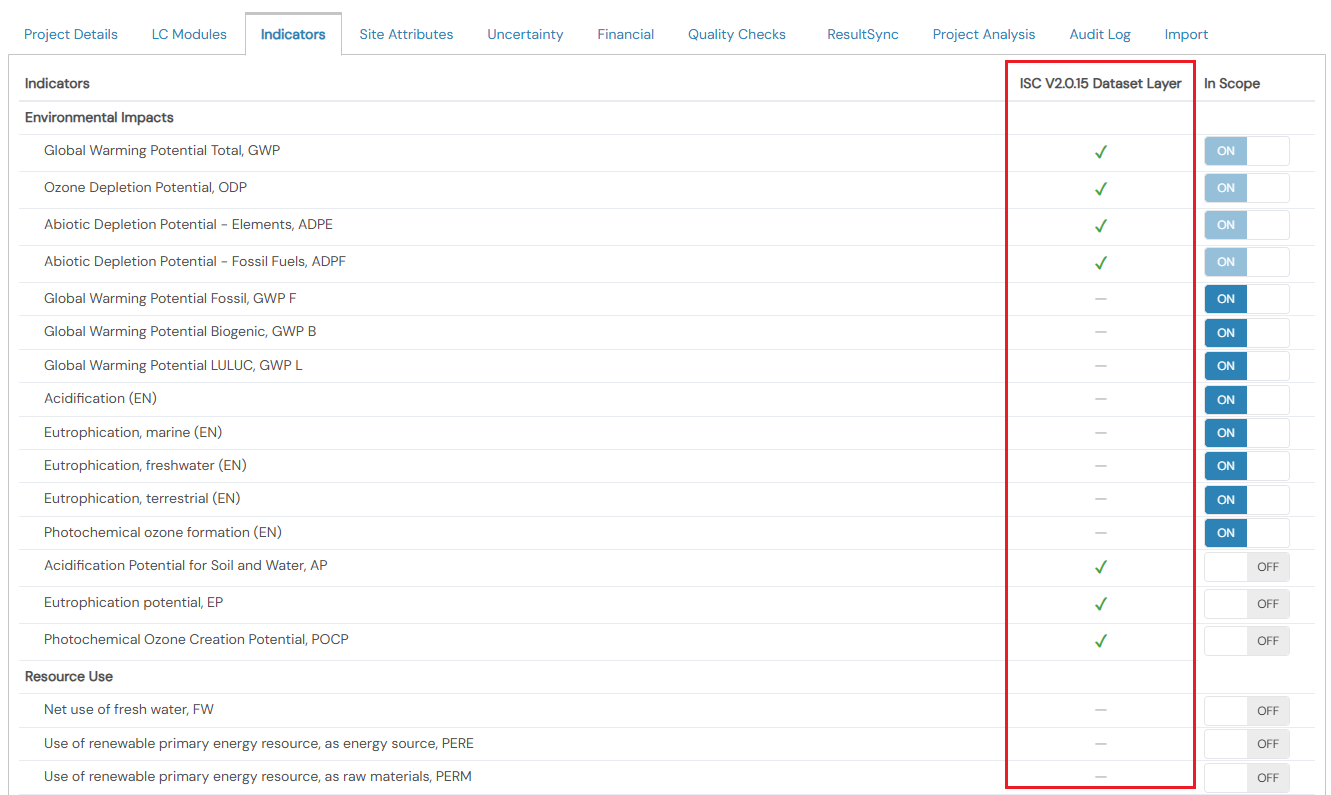
In the Project Level, you can easily see which impact indicators are covered by the Dataset Layer you’ve selected via the new Dataset Layer column and which impact indicators will be supplied by the Project Default LCI.
By default, eTool will pre-select mandatory indicators as required by the Calculation Standard specified. However, when you have selected a Dataset Layer you will have the option to align the indicators to match the Dataset layer selected by excluding indicators from your LCA scope accordingly. Note that doing this may mean that your study will no longer be aligned with the Calculation Standard selected.
ISC V2.0.15
This version of the ISC Dataset only has values for the following. All other missing values will be drawn from the EPD Layer and/or Project Default LCI:
LC Modules
- A1A3
- Transportation (A4 & C2)
- Light Commercial
- Rigid truck
- Articulated Truck
- Rail
- Sea
- Concrete Agitator Truck
Environmental Impact Indicators
- Global Warming Potential Total, GWP
- Ozone Depletion Potential, ODP
- Acidication Potential for Soil and Water, AP
- Eutrophication Potential, EP
- Photochemical Ozone Creation Potential, POCP
- Abiotic Depletion Potential – Elements, ADPE
- Abiotic Depletion Potential – Fossil Fuels, ADPF
- ISCA Enviropoints V2.0
Click here for guidance on how to model your project for ISC.
NABERS v2026.1
NABERS only has values for the following. All other missing values will be drawn from the EPD Layer and/or Project Default LCI:
LC Modules
- A1A3
- Transportation (A4 & C2)
- Rigid truck
- Articulated Truck
- Rail
- Sea
- Concrete Agitator Truck
- Trades Vehicle
Environmental Impact Indicators
- Global Warming Potential Total, GWP
- Global Warming Potential Biogenic, GWP B
How to Use the EPD Layer
With the new Layer functionality in eTool, adding EPDs into eTool has also changed. Please refer to the Using EPDs post for updated guidance on how the new EPD Layer works.
Related Posts
