
Wondering how to use EPD (Environmental Product Declaration) in eTool?
The software allows users to create new EPDs in eTool, add EPD to designs, compare EPD with the materials in the inventory, make comparison between different EPDs and also understand how specific products correlate with the whole project performance.
Jump to the following sections in this post:
- EPD Library
- Sharing
- Tagging
- Create New EPDs with Excel Templates
- Import EPDs into eTool
- How to Add An EPD Into Your Design
- Updated EPD Standard: EN 15804+A2
- Other Info
- Related Links
EPD Library
We’ve improved the search functionality for the EPD library. The main search panel works in the same way as when you’re adding a template to a Design – the more words you add to the field, the more accurate the results. The order of your words does not matter.
You can also filter your search based on the different columns by entering your search terms in the column fields. When using the column search fields, note the following:
- The order of your words will be important when using these column fields as the search functionality will reference that.
- Using quotation marks (” “) around a particular term will tell the system to match exactly.
- Use your right mouse click in the columns to open additional filter options in the EPD library
Please refer to the animation below for more information on how the search functionality of the EPD library works.

Sharing
Due to popular demand, you can now share EPDs with all members of your organisation with the same functionality as Template sharing.
Simply navigate to the ‘Details’ tab of your custom EPD and select the applicable name under the ‘Organisation’ field.
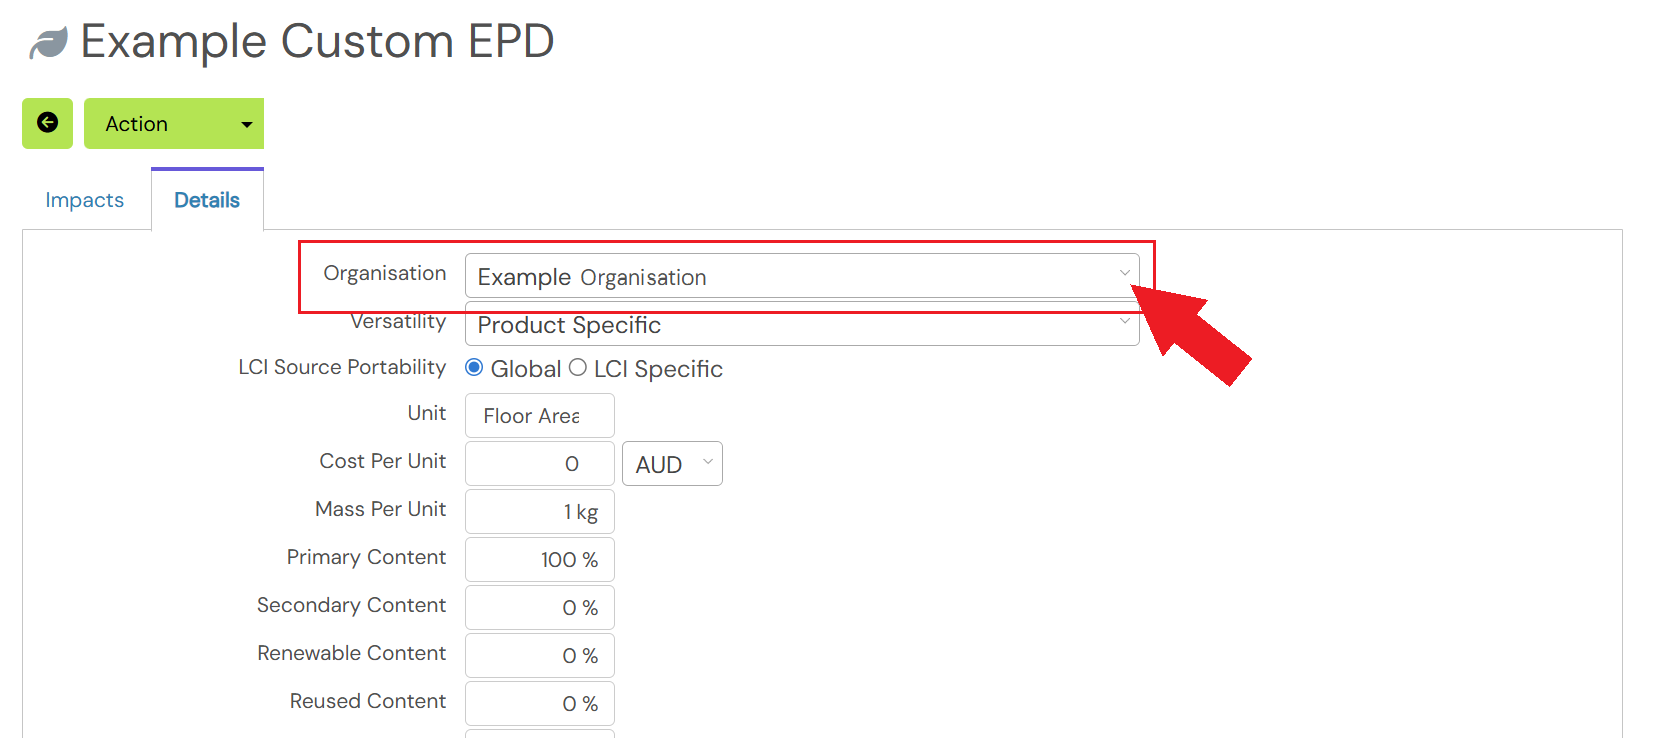
Note the following functionalities will be allowed once the EPD is assigned to an organisation:
- All organisation members will be allowed to add the EPDs to their Designs or Templates.
-
Only organisation admins will be allowed to edit and modify the EPDs in the library.
- Organisation admins will be able to transfer all EPDs that have been assigned to the organisation from one member to another using the ‘Reassign Data’ button.

Tagging

You can now apply tags to EPDs! For more information on how to do this, please refer to this post: Tags
Create New EPDs with Excel Templates
Since our integration with the EcoPlatform EPD Portal in Oct 2024, our EPD library now has thousands of EPDs and growing. If you’re still unable to find your EPD in the library, there is always the option to manually add it into eTool as long as you have the EPD.
eTool has the ability to import impacts from excel and copy and paste to and from excel. To download a copy of the excel template, you must first create a new EPD by clicking on ‘+ New EPD’ in the EPD Library.

The below fields must be filled out at minimum in order to be able to create the EPD:
- Name
- Versatility
- Unit
- Currency
- Primary Content and/or Secondary Content
- EPD Program Operator
- Supplier Name
- EPD Title
- Date
- Author
Once the new EPD has been created, click into the ‘Impacts‘ tab and then click on the ‘Download Excel‘ button to download a copy of the blank spreadsheet (if it’s a brand new EPD).

Note: Module D
The new EN standards +A1 & +A2 and RICS 2E reports module D under two parts – D1 – Benefits and Loads From Material Reuse, Recycling and Energy Recovery & D2 (Benefits and Loads From Exported Utilities (Energy and Water). However in eTool, under the three new Calculation Standards, we’ve broken module D1 further down into 4 parts when entering EPDs:
- D1.1 – Closed loop recycling
- D1.2 – Open loop recycling
- D1.3 – Materials energy recovery
- D1.4 – Direct reuse
This reflects modules D2-5 that was in our ‘Legacy’ calculation standard. When filling out the EPD import excel sheet for module D1, just add the whole impact under any column that is the most relevant.
After you’ve filled out the spreadsheet from the data in the EPD, you can upload the spreadsheet back into your new EPD by clicking on the ‘Import Excel‘ button.
Don’t forget to fill out the details tab with all information required to ensure usability and transparency of product information, and correct application in whole project LCA studies.
If you wish to get your EPD validated and made public, you may consider asking Cerclos to validate it. Please submit a Support Request if you would like us to review your EPD and share it with all eTool users.
Import EPDs into eTool
You now have the option to import EPDs into eTool if you have them in the OpenEPD or ILCD+EPD file formats.
Simply click on the ‘Upload EPD’ button and you can drag drop your files into eTool to upload.

How to Add An EPD Into Your Design
Back in your Design, just click on the green ‘+Add EPD‘ button on the right side of the page.
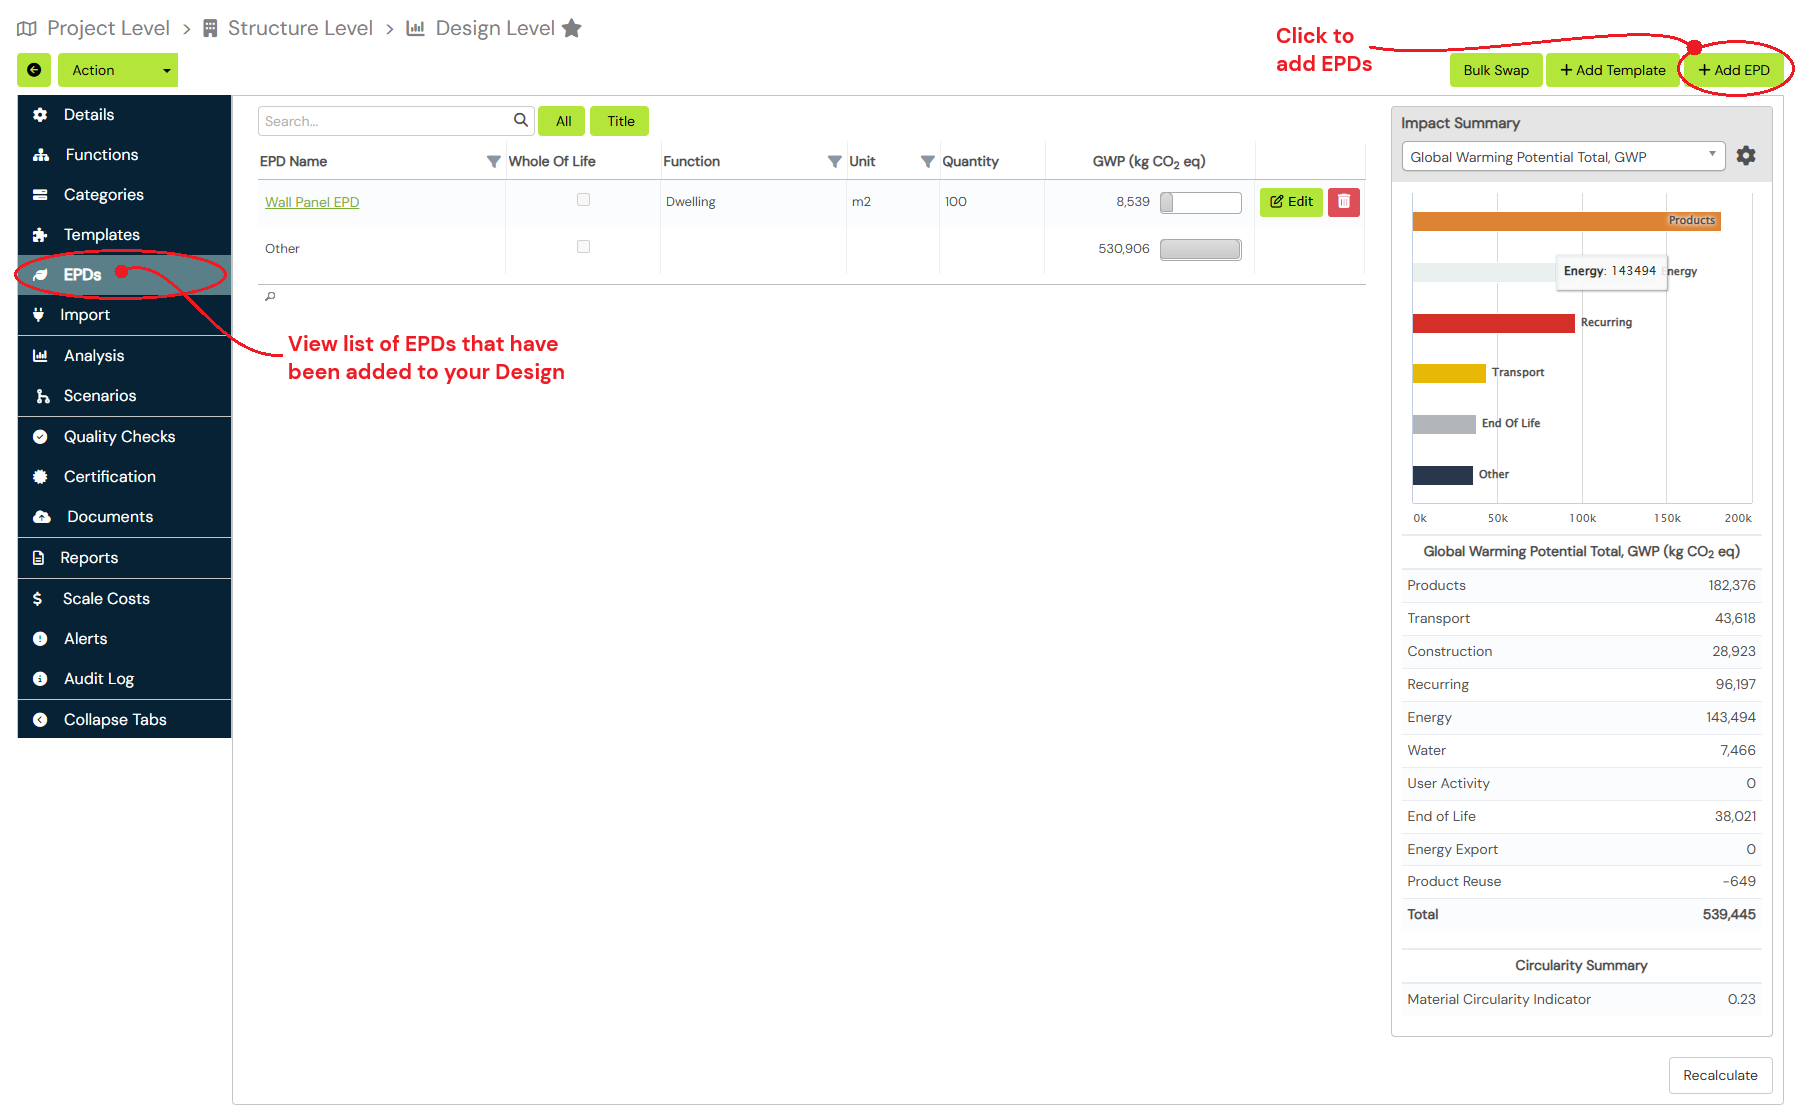
In the pop-up window, fill out the fields and select your EPD by searching the library. You may click ‘Save’ straight away to add the EPD, as is, to your design. After you’ve added your EPDs, you can find them in your Design by clicking on the ‘EPDs‘ tab on the left hand menu bar.
Filling EPD Gaps with the EPD Layer
EPDs tend to require more attention to incorporate robustly into a whole building LCA as scopes and indicators won´t always match. This is changing in the industry, however most existing EPDs do not include end-of-life or maintenance/repair impacts because the manufacturer has little control over how the product gets used and what end-of-life assumption should be applied. Therefore, be wary of ‘gaps’ in the EPDs which, as best practice, you should always attempt to fill when conducting an LCA.
In eTool, our EPD Layer feature allows users to quickly fill these gaps with more complete data. The EPD provides the data for modules A1-A3 and the rest of the missing data is drawn from from the eTool data and/or the Dataset Layer. You can read Layers for more information on how this works.

When adding or editing EPDs in your Design/Template, you’ll notice this extra checkbox at the bottom of the pop-up window that says ‘Whole of life regionalisation’. When unchecked, only all the values from the EPD are used regardless of completeness. When this is checked, only A1A3 values from the EPD is used while data from the Dataset Layer and/or Project Default LCI will be used for all other modules if you fill out the additional inputs below. If you would like more values from the EPD to be used, please consider using the alternative methods outlined in the next section below.

The following inputs can be specified for the EPD and will draw data from the Dataset Layer or Project Default LCI:
- Mass Per Unit – this is compulsory to enable eTool to calculate the additional impacts
- Application Description – this is optional
- B1 Surface Area Adjustment – optional (only applicable for concrete)
- Construction Waste Factor – eTool will calculate the construction waste impacts of the product using the A1A3 impacts from the EPD. Refer to this link for guidance on typical construction waste rates.
- Lost or Damaged in Transport – impacts for products lost/damaged during transport to site can be accounted for here.
- Material Life – useful life of the product. This can be based on what’s declared in the EPD or user specified.
- Maintenance or Repair interval – specify the interval of when the product will be repaired in years. This can be based on what’s assumed in the EPD or user specified.
- Maintenance Quantity – specify the percentage of the product that will be replaced during repair. This can be based on what’s assumed in the EPD or user specified.
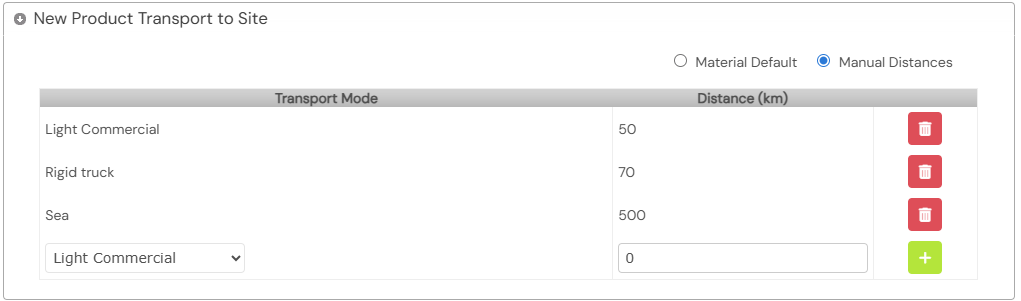
- New Product Transport to Site – ‘Material Default’ means no transportation has been accounted for. To add transport impacts, change this to ‘Manual Distances’ and add them in manually. This can be based on what’s assumed in the EPD or user specified. This is also where you add additional transport impacts for products imported from overseas.
- End of Life Disposal/Recovery Methods – by default, no disposal is assumed and impacts will need to be added manually. This can be based on the disposal method assumed in the EPD or user specified. Click here for more guidance on how to add multi-disposal methods.
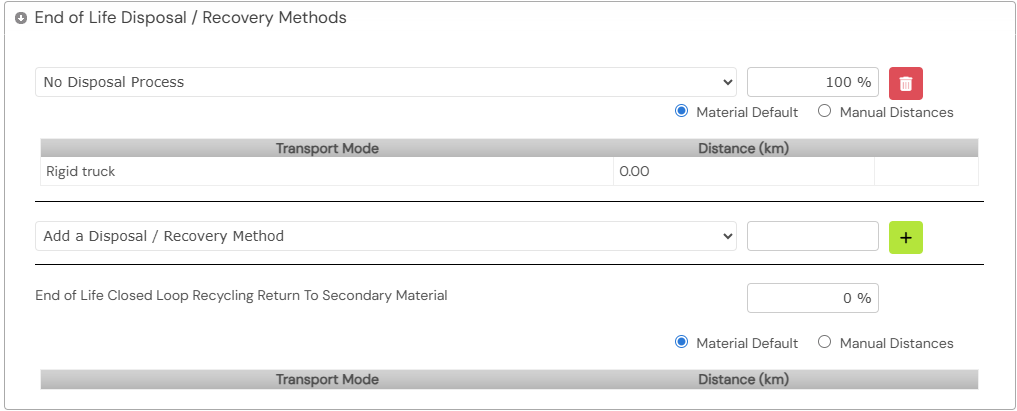
Once these fields have been populated, eTool will automatically use the A1A3 data from the EPD and data from the Dataset Layer or Project Default LCI to calculate and report against every module and indicator in your LCA scope based on the additional information you’ve provided.
This EPD Layer feature is also available in the Template library if you wish to add an EPD into a Template.
EPD Gap Filling Alternatives
If you would like to use the other values besides A1A3 in your EPD gap filling exercise, here are some alternatives to using the whole of life regionalisation checkbox method above:
For both these methods, you need to add the EPD of your choice like normal except you leave the ‘Regionalise’ check box empty so that all modules in the EPD are included.
Use ‘Zero Impact Material’ (less accurate)
If you wish to add only the transportation impacts for the EPD product to site, may use the ‘zero impact material’ method which is fairly quick to do but less accurate. Note that this is only available for templates/projects using an eTool Default LCI source.
- In your template, navigate to the correct category and add an element.

- Select the ‘Zero Impact Product/Material’ option under Material (only available for eTool Default LCI sources).

- Continue with filling out the rest of the material details.

- After clicking ‘Save’ the zero impact element you’ve added will have no material impact (which is provided by the EPD) and will only have the transport impact as per the specifications you’ve entered (including any recurring transport impacts if applicable).
Use ‘Negative’ Material (more accurate)
If you like to have more control over your results and want to more accurately remove the default material impacts from the template, you can use the ‘negative’ material method below:
- Navigate to the category where your default material is in. In this example, the concrete is in the Substructure. Note the current GWP impacts under the ‘Products’ category (highlighted).

- Next, click ‘+Add Substructure‘ to add exactly the same material as the original which in this case is Concrete | Unreinforced | Portland Cement Blend | 40 MPa material.
- In the material pop-up window, make sure that you enter the negative amount of the quantity you want to offset (pay attention that the units are correct as well) and that the inputs for ‘Lost or Damaged in Transport’ is changed to be the same as the default material. The ‘Disposal or Recovery Method’ & ‘New Product Transport to Site’ inputs (as highlighted below) need to be set to zero to ensure that only A1-A3 material impacts are offset.

- Click ‘Save’ to add the new material to the category.
- Back in the category summary view, you’ll now see that only the GWP for Products and Transport (A1-A4) has been affected while all other impacts have remained the same.

- You can also confirm this by running a custom table in the Analysis Tab. Note that the inputs under A4 are only for the impact of any products lost or damaged in transport.

- Now that you have removed the GWP impact of the default material, the EPD that you now add to the template will fill in the gap for the material impacts.
If you’re working in a template, don’t forget to update the template details/description to reflect the changes you’ve made and explain your assumptions. This is good practice to ensure that you have a record/reference of what you’ve done to the template and what’s in the EPD, your assumptions and any extra notes.
Updated EPD Standard: EN 15804+A2
For more information on the updated EPD Standard EN 15804+A2, please refer to this support post: Updated EPD Standard: EN 15804+A2
Other Info
You can also find EPDs from different program operators for example:
- Australasian EPD Program
- EnvironDec – International EPD System
- IBU – Institut Bauen und Umwelt e.V.
- Eco Platform – List of all Eco EPD
- UL Environment – SPOT
Related Links:
EPD Bulk Data Upload
Improved EPDs summary and input
Impact Categories for EPDs
Can materials manufacturers load their products into eTool?
How does eTool calculate the burdens and benefits associated with recycling?
How Closed Loop Recycling works in EN15978
Who should benefit from recycling in construction product EPD?
